table of contents
- Introduction
- Prerequisites
- Step 1: Prepare Your Laravel Project
- Step 2: Set Up the Database
- Step 3: Configure the Environment Variables
- Step 4: Transfer Files to Namecheap Hosting
- Step 5: Configure the Public Directory
- Step 6: Set File and Folder Permissions
- Step 7: Run the Migration and Seed the Database
- Step 8: Configure the .htaccess File
- Step 9: Test Your Laravel Project
- Conclusion
Introduction
If you're a Laravel developer looking for a good tutorial to deploy your project to Namecheap shared hosting, you've come to the right place. Deploying a Laravel project to shared hosting can seem challenging at first, but with the right steps and guidance, you can have your project up and running smoothly. In this article, we'll provide you with a complete tutorial on how to deploy a Laravel project to Namecheap shared hosting.
1. Prerequisites
Ensure that you have the following requirements prepared before beginning the deployment process:
- A Namecheap shared hosting account
- Access to cPanel
- An existing Laravel project
- FTP client software (e.g., FileZilla)
- SSH access (optional but recommended)
Step 1: Prepare Your Laravel Project
Before deploying your Laravel project, ensure it is ready for production. This includes optimizing your code, configuring necessary environment variables, and setting up any required dependencies or packages.
Step 2: Set Up the Database
Create a new MySQL database on your Namecheap shared hosting account through cPanel. You'll need the database name, username, and password later on for .env file, so write them down.
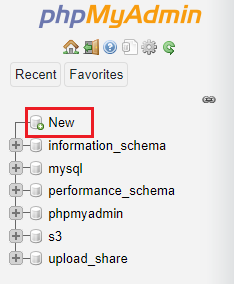
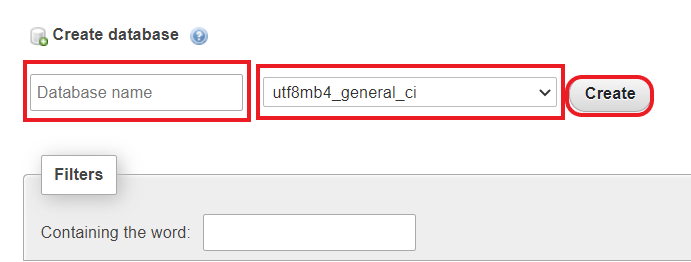
How to create new Database in phpMyAdmin:
- Step 1: Login into phpMyAdmin.
- Step 2: Click on New button to create a new database.

- Step 3: Provide database name and select
utf8mb4_general_cias collation and click create button.
- Step 4: Make sure you have database user who can access this newly created database, if not you will need create one with all permissions and set a password.
- Step 5: Also, to avoid any issues with database setup, make sure your newly created database has InnoDB set as storage type.
- Step 6: Enter your freshly created database credentials when you return to the Install process. Setting the database host to localhost and the MySQL port to 3306.
Step 3: Configure the Environment Variables
Update the .env file of your Laravel project to reflect the database credentials you obtained in the previous step. Additionally, modify any other environment variables specific to your shared hosting environment.
What are the environment variables that should be edited before production??
You should edit the following environment variables before deploying your Laravel app to production:
    APP_URL=https://your-domain.com
    APP_ENV=production
    APP_DEBUG=false
    DB_CONNECTION=mysql
    DB_HOST=localhost
    DB_PORT=3306
    DB_DATABASE=db_name
    DB_USERNAME=db_username
    DB_PASSWORD=db_pass
And don't forget to protect .env file from hackers. Go to .htaccess configuration for more.
Step 4: Transfer Files to Namecheap Hosting
Using an FTP client, connect to your Namecheap shared hosting account and upload your Laravel project files to the appropriate directory. Ensure that your files are placed in the public_html directory or the subdirectory you intend to use.
Step 5: Configure the Public Directory
Within the root directory of your Laravel project, locate the index.php file. In order to point to the proper directory for your Laravel application, modify the following line of code:
require __DIR__.'/../vendor/autoload.php';Step 6: Set File and Folder Permissions
Some Laravel directories require specific permissions to function correctly. Set the necessary permissions for the storage and bootstrap/cache directories to ensure Laravel can read and write to them.
Step 7: Run the Migration and Seed the Database
Open a terminal or SSH into your shared hosting account. Navigate to the root directory of your Laravel project and run the necessary migration and database seeding commands to set up your database tables and seed initial data.
How To Run the Migration and Seed the Database
by the following commands, you can run migrations and seed the database:
- For database migration use:
php artisan migrate - For database seeding use:
php artisan db:seed
Step 8: Configure the .htaccess File
Create a new file called .htaccess in the root directory of your Laravel project. Insert the necessary configurations to redirect requests to the public/index.php file and enable clean URLs.
.htaccess configuration
    RewriteEngine on

    # Disable directory browsing
    Options -Indexes

    # Your configurations

    # PROTECT ENV FILE
    <Files .env>
        order allow,deny
        Deny from all
    </Files>

    #PROTECT htaccess FILE
    <Files .htaccess>
        order allow,deny
        Deny from all
    </Files>

    # Security Headers
    <IfModule mod_headers.c>
        # X-XSS-Protection
        Header set X-XSS-Protection "1; mode=block"
        # X-Content-Type-Options
        Header set X-Content-Type-Options "nosniff"
        # X-Frame-Options
        Header set X-Frame-Options "SAMEORIGIN"
    </IfModule>
Step 9: Test Your Laravel Project
At this point, your Laravel project should be successfully deployed to Namecheap shared hosting. Test your application by visiting the domain associated with your shared hosting account. Ensure all functionalities are working as expected.
Conclusion
Congratulations! You have successfully deployed your Laravel project to Namecheap shared hosting. You can make sure that the process of deployment is simple and hassle-free by following the guidelines provided in this article. Remember to regularly update and maintain your project to keep it secure and up to date.
FAQs (Frequently Asked Questions)
- Can I deploy a Laravel project to Namecheap shared hosting without SSH access?
Yes, it is possible to deploy a Laravel project to Namecheap shared hosting without SSH access. However, having SSH access provides additional flexibility and convenience for managing your project.
- Are there any specific PHP or Laravel versions required for Namecheap shared hosting?
Namecheap shared hosting typically supports a wide range of PHP and Laravel versions. It's recommended to check with Namecheap or refer to their documentation for the specific versions available on your hosting plan.
- Can I use a different database engine instead of MySQL with Laravel on Namecheap shared hosting?
While MySQL is the most commonly used database engine with Laravel, Namecheap shared hosting also supports other popular database engines like PostgreSQL. You can configure Laravel to use a different database engine if required.
- How can I secure my Laravel project on Namecheap shared hosting?
To enhance the security of your Laravel project on Namecheap shared hosting, consider implementing measures such as using HTTPS, keeping your dependencies updated, and following Laravel's security best practices.
- Can I install additional Laravel packages on Namecheap shared hosting?
Yes, you can install additional Laravel packages on Namecheap shared hosting by using Composer. However, ensure that your hosting plan allows the necessary permissions and resources to install and use these packages.

